Release Notes: InTouch Presents v1.1
INTOUCH HELP HOME > INTOUCH PRESENTS > RELEASE NOTES
This release, dated Sept 12, 2017, includes:
Enhancements
Improved Viewing/Messaging for Live Presentations
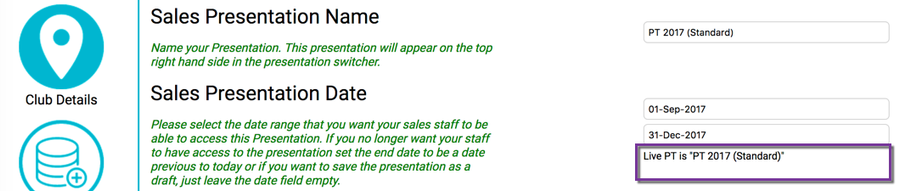
To view which presentations you currently have set (live) for Membership and/or PT leads, go to your Presents Admin. Under Club Details > Sales Presentation Date will be a list of all live Presentations.
The example below only shows "Live PT". This indicates that there is no live presentation for Membership leads, only PT leads. If you try to Launch Presents for a Membership Lead, you'll get a message stating "There are no live presentations for this club. Please contact the administrator to adjust your presentations date ranges."
Improved Image Uploading
Resolution and Auto-Resizing
Recommendations for sizing and resolution of Custom Slides or Backgrounds:
- Use a file type of .jpg or .png
- Keep images under 10 MB (larger images take a long time to load and may result in a time error)
- Use a resolution size of 1920 pixels in width x 1280 pixels in height, but smaller images will auto-resize to fit your screen
Ability to Revert to an Original Image
If you've uploaded a custom image, but decide not to use it, you can delete your custom Background file to revert to the original.
Slides using a Custom Background will show a Revert to Original Image button. Select this button and confirm that you wish to delete the image and revert to the original.

More Custom Options
- You can now add up to 20 custom slides!
Custom Slides are listed in your Presents Admin under Build Presentation - Add a YouTubeVideo to any Custom slide
- Find your video on YouTube
- Copy the YouTube address (eg, https://www.youtube.com/watch?v=5Z_Y6LnJCoY&feature=youtu.be or https://youtu.be/5Z_Y6LnJCoY)
Note: The YouTube field really only needs the video identifier (eg, 5Z_Y6LnJCoY) and you'll see the field automatically update to just the needed identifier after Saving. - Paste into the YouTube field next to the appropriate slide.
- Remember to both Preview and Save your changes
- Add a website to any Custom slide
- Paste the URL of the desired website into the Website URL field next to your Custom slide.
Note: If your website does not automatically display, you may need to adjust the pop-up blocker settings on your internet browser.
- Paste the URL of the desired website into the Website URL field next to your Custom slide.