Web Leads Setup Guide
The purpose of this document is to describe how to set up an HTML form on your club website so that leads can be sent directly into InTouch. Your web master should be able to incorporate the required form in less than 1 hour. Below we provide a complete of how to use the web lead form, including examples with source code. Once set up, leads from your website are posted directly into our Web Lead Form Service and immediately become available in InTouch.
Contents:
Overview
You'll need someone with development access (access to do HTML coding) of your website to set this up for you. If your website was developed by a 3rd party then they will probably need to do the work for you. Anyone with a basic understanding of HTML and web forms has the skills necessary to integrate the Web Lead Form Service into the website. The main body of this document focuses on the minimal HTML that you need. If your web resource understands JavaScript then you can make success and failure pages with better messages, but this is not required to get the Web Lead Form Service installed.
They will need to:
- Add an HTML <form> to your website to capture the lead's information
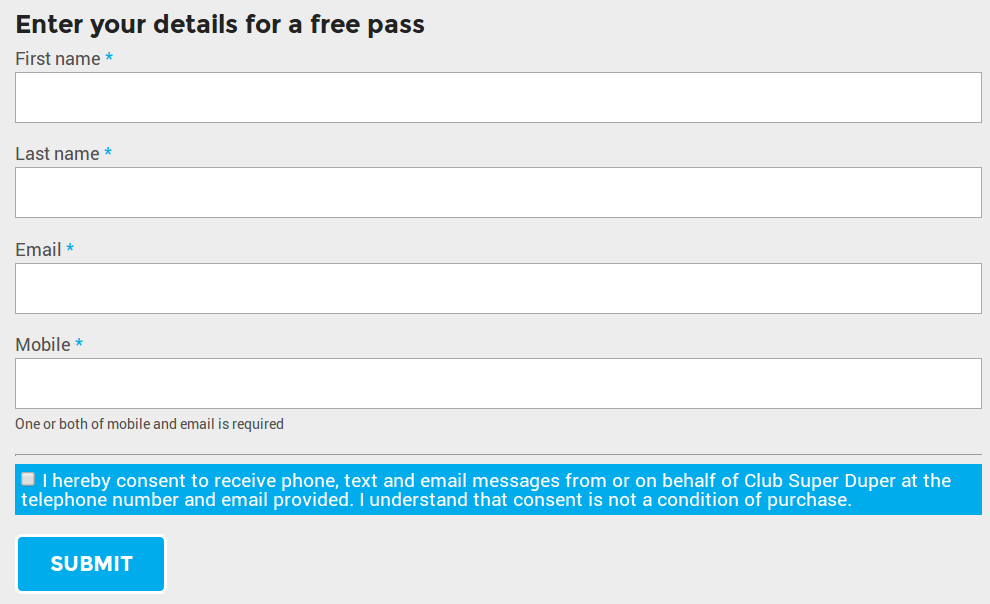
- The working form will look like the screen shot the sample section, except it can be styled to the look and feel of your main web site.
- Create a success page to indicate that the lead was added.
- The success page can have any name that you want, and must be set using the hidden <input> parameter for successPage.
- The working form will look like the screen shot the sample section, except it can be styled to the look and feel of your main web site.
- Create a page to indicate that the lead failed to be added.
- The failure page can have any name that you want, and must be set using the hidden <input> parameter for failurePage.
- The working form will look like the screen shot the sample section, except it can be styled to the look and feel of your main web site.
Form Properties & Fields
Properties
The attribute values for the <form> HTML tag must be as follows:
action: https://app.intouchfollowup.com/intouch-webapp/weblead/form/method: POST
Mandatory Fields
Below are the fields that must be sent with every form submission. Failure to submit one of these will result in the failure page being shown
Form Name | Description | Max Chars | Validation |
UUID | This is the Universally Unique IDentifier of your club in InTouch. It can be found within your site under Admin>Club. You will need to be logged in with Administrator privileges to see the Admin Tab.
| 36 | |
firstName | First name of the user | 30 | |
lastName | Last name of the user | 30 | |
Email address of the user | 50 | One of email or mobile is mandatory | |
mobile | Mobile number of the user | 15 | One of email or mobile is mandatory |
Optional Fields
The following fields are optional and can be added if you wish. Please note that some of these fields may be mandatory depending on your local legislation. We recommend that you look into the email and text messaging laws in your own state/country and seek legal advice to ensure that you add the necessary fields so your club is compliant with your local regulations.
Form Name | Description | Max Chars | Validation |
street | Street address | 30 | |
city | City | 30 | |
state | Province/State | 30 | |
country | Country as 2 letter country code | 2 | |
zipCode | State/Zipcode | 10 | |
company | Company | 30 | |
homePhone | Home telephone number | 15 | |
workPhone | Work telephone number | ||
gender | Gender ('M' or 'F') | 1 | |
contactBirthDate | Birthdate in "yyyy-mm-dd" format | 10 | |
| contactMethod | Must be one of your contact methods. Defaults to "WEB LEAD". | ||
leadSource | Must be one of your lead source types. If no value is sent then it will default to 'WEB SITE'. Warning: Changing the lead source to a value other than 'WEB SITE' will cause the new lead to not be classified as a web lead and they will not get the 'Web Lead Email' | N/A | Must exist in InTouch |
leadComments | Additional comments for the lead. These fields will be added to the history | 250 | |
leadSourceDetails | Addition details for the lead source | 250 | |
productDetails | Details field is useful if you have more than one kind of product that you are collecting leads for, i.e. annual membership, 6 week trial, etc
| 250 | |
| textPref | Used to set the text message preferences for the user so that they can subscribe or unsubscribe. If this value is not sent then the defaults defined in club settings will occur. Valid values to send: Using this field it is possible to add a checkbox to say something like: "I hereby consent to receive text messages from or on behalf of <clubname> at the telephone number provided. I understand that consent is not a condition of purchase." Additional notes for clubs that use text message opt-in
Important: It is NOT possible to use a plain checkbox. A plain checkbox does not submit a value when unchecked. Please see the appendix below for instructions on how to accomplish this. Submitting a regular checkbox value of 'on' for textPref will result in an error | ||
| emailPref | Used to capture subscription preferences for email Valid values to send: If no value is sent, then the default defined in club settings will be used. | ||
mobilePhonePref workPhonePref homePhonePref | Used to capture which phone numbers club can contact lead on Valid values to send: If no value is sent, then the default defined in club settings will be used. |
Example Source Code
Here is the simplest source possible for the web lead form.
	<form name="createLead" action="https://app.intouchfollowup.com/intouch-webapp/weblead/form/" method="POST">
		<!-- Replace each 'value' with the URL for your success and failure pages -->
		<input type="hidden" name="successPage" value="http://www.myclubwebsite.com/success">
		<input type="hidden" name="failurePage" value="http://www.myclubwebsite.com/failure">
		<!-- Replace the 'value' here with your club UUID -->
		<input type="hidden" name="UUID" value="11111111-1111-1111-1111-111111111111">

		<table>
			<tr>
				<td>First Name</td>
				<td><input name="firstName" type="text" size="40" required></td>
			</tr>
			<tr>
				<td>Last Name</td>
				<td><input name="lastName" type="text" size="40" required></td>
			</tr>
			<tr>
				<td>Email</td>
				<td><input name="email" type="text" size="30"></td>
			</tr>
			<tr>
				<td>Mobile</td>
				<td><input name="mobile" type="text" size="16"></td>
			</tr>
			<tr>
				<td></td>
				<td><small>One or both of mobile and email is required</small></td>
			</tr>
			<tr>
				<td colspan="2"><HR></td>
			</tr>
			<tr>
				<td></td>
				<td align="right"><input type="submit" value="Send"></td>
			</tr>
		</table>
	</form>
InTouch also recommends that you gather consent for communication so that you can send text messages and emails. You would need to additionally add the following code above the </table> tag.
			<tr>
				<td></td>
				<td>
					<!-- These five preference fields represent the five options that can be submitted. Not submitting a value will result in club defaults being used -->
					<input name="emailPref" type="hidden" value="unsubscribe">
					<input name="textPref" type="hidden" value="unsubscribe">
					<input name="mobilePhonePref" type="hidden" value="cannot_contact" >
					<input name="workPhonePref" type="hidden" value="cannot_contact" >
					<input name="homePhonePref" type="hidden" value="cannot_contact" >
					<!-- This checkbox will run the above Javascript which will toggle the preference values. -->
					<input name="allPrefsToggle" type="checkbox">
					I hereby consent to receive phone, text and email messages from or on behalf of Club Super Duper at the telephone number and email provided. I understand that consent is not a condition of purchase.
				</td>
			</tr>
This code requires JavaScript. In this case add the following code just below your <body> tag.
	<script src="//code.jquery.com/jquery-1.7.2.min.js"></script>
	<script type="text/javascript">
        $(document).ready(function() {
			var allPrefsToggle = $('[name="allPrefsToggle"]');
			var textPref = $('[name="textPref"]');
			var emailPref = $('[name="emailPref"]');
			var mobilePhonePref = $('[name="mobilePhonePref"]');
			var workPhonePref = $('[name="workPhonePref"]');
			var homePhonePref = $('[name="homePhonePref"]');
			allPrefsToggle.change(function() {
				textPref.val($(this).is(':checked') ? 'subscribe' : 'unsubscribe');
				emailPref.val($(this).is(':checked') ? 'subscribe' : 'unsubscribe');
				mobilePhonePref.val($(this).is(':checked') ? 'can_contact' : 'cannot_contact');
				workPhonePref.val($(this).is(':checked') ? 'can_contact' : 'cannot_contact');
				homePhonePref.val($(this).is(':checked') ? 'can_contact' : 'cannot_contact');
			});
        });
	</script>
Sample Files
Click the links below for sample HTML files. These files are meant to demonstrate the simplest web form possible.
- simplewebleadform.html - This is an example of the simplest possible form.
- success.html - An example response page returned when a lead is successfully created.
- failure.html - An example response page returned when an error occurred during web lead creation.
simplewebleadform.html
Link: https://app.intouchfollowup.com/intouch-webapp/samples/simplewebleadform.html
This is an example of a simple web form using consent. It order to let you try it out live, we have left the club UUID field as visible instead of hidden.
success.html
Link: https://app.intouchfollowup.com/intouch-webapp/samples/success.html
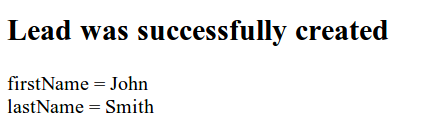
This example success page additionally pulls some of the returned info from the URL to display. See appendix for instructions as additional JavaScript is required.
failure.html
Link: https://app.intouchfollowup.com/intouch-webapp/samples/failure.html
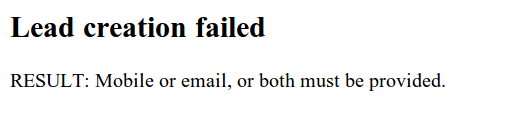
This example failuire page additionally pulls the error message so it can be displayed. See appendix. See appendix for instructions as additional JavaScript is required.
Appendix
Return status
With the successPage and failurePage, the response is encoded in URI in the following format
result=<STATUS_MESSAGE>&resultCode=<STATUS_CODE>
Possible codes are
| Description | resultCode | result | |
|---|---|---|---|
| Success | 1 | Success | |
| Error looking up club | -1, -2, -3 | UUID (Club identifier) and/or GGCLUBID is missing or invalid | |
| Validation error | -4 | <Depends on field or fields that failed validation> | |
| System error | -5, -7, -8 | A system internal error occurred. Please report the resultCode to support | |
| Account disabled | -11 | Your web lead form has been disabled by InTouch. Contact support. |
Advanced Error Handling
When an error occurs, the lead's browser is redirected to the failure page. This page can be a generic page but most often it is more useful to display an error message to the user so that they can make corrections and re-submit the form. This section outlines how to output the returned error message using JavaScript.
This sample code uses a free online JavaScript library called CSJSRequestObject.
In the failure HTML page, the following JavaScript code is required:
<script type="text/javascript" src="CSJSRequestObject.js"></script>
 <script type="text/javascript" >
 <!--
 function urldecode(psEncodeString)
 {
 // Create a regular expression to search all +s in the string
 var lsRegExp = /\+/g;
 // Return the decoded string
 return unescape(String(psEncodeString).replace(lsRegExp, " "));
 }
 // -->
</script>
And then, to output the returned error use the following code
<body>
 <h2>Lead creation failed</h2>
 <script type="text/javascript">
 document.write(urldecode(Request.QueryString("result")));
 </script>
</body>
Here is what the resulting page looks like when the Web Lead Form Service returns an error about a missing or invalid first name.
Web Referrals
The normal default values for the contact method and lead source type fields are 'WEB LEAD' and 'WEB SITE' respectively. There is a second option for lead source type though called 'WEB REFERRAL'. This additional lead source type is used to track web lead email referrals within the InTouch system.
There are two similar options that you can use to implement web referrals.
- Have a second web lead form page that is almost a duplicate of the main page with the only difference being a hidden form field value of 'WEB REFERRAL' for lead source type. When a web lead referral email goes out it will contain a link to this second page, and will implicitly get set against the lead
- Add functionality to the original page and have it determine which lead source type value should be sent, 'WEB SITE' or 'WEB REFERRAL'. The web lead referral email would have a link to the same web lead page, but with an additional argument of your choosing. Your page would need to look at this argument to determine which lead source type to use.
Note that a 'Web Referral' is not the same as an actual referral as completed from the main InTouch application. In the case of a 'Web Referral' there is no member linked to the new lead as the member who did the referral.
Example Web Referral Code:
<form name="createLead" method="post" action="https://app.intouchfollowup.com/intouch-webapp/weblead/form/" >

      <!-- Update these 'value' fields -->
      <input type="hidden" name="successPage" value="http://example.com/success.html">
      <input type="hidden" name="failurePage" value="http://example.com/failure.html">
      <input type="hidden" name="UUID" value="11111111-1111-1111-1111-111111111111">
      <!-- End updates -->

      <input type="hidden" name="leadSource" value="WEB REFERRAL">

	<table>
		<tr>
			<td>Your Full Name</td>
			<td><input name="leadSourceDetails" type="text" size="40" required/></td>
		</tr>

		<tr>
			<td>Friend's First Name</td>
			<td><input name="firstName" type="text" size="40" required/></td>
		</tr>

		<tr>
			<td>Friend's Last Name</td>
			<td><input name="lastName" type="text" size="40" required/></td>
		</tr>

		<tr>
			<td>Friend's Email</td>
			<td><input name="email" type="text" placeholder="Email or Mobile Required" size="40" /></td>
		</tr>

		<tr>
			<td>Friend's Mobile</td>
			<td><input name="mobile" type="text" placeholder="Email or Mobile Required" size="40" /></td>
		</tr>

		<tr>
			<td></td>
			<td align="left"><input type="submit" value="Submit"></td>
		</tr>
	</table>
</form>
Handling Multiple Clubs
If you have multiple InTouch clubs and you would like to present your users with a drop down to select which club they would like, replace the following code
<!-- Replace with your InTouch club UUID -->
<input type="hidden" name="UUID" value="XXXXXXXX-XXXX-XXXX-XXXX-XXXXXXXXXXXX"/>
With this code
<!-- Replace with your InTouch club UUIDs and names -->
<select name="UUID"/>
 <option value="XXXXXXXX-XXXX-XXXX-XXXX-XXXXXXXXXXXX">1st club's name</option>
 <option value="XXXXXXXX-XXXX-XXXX-XXXX-XXXXXXXXXXXX">2nd club's name</option>
 <option value="XXXXXXXX-XXXX-XXXX-XXXX-XXXXXXXXXXXX">3rd club's name</option>
</select>
Submitting Communication Preferences with a Checkbox
Unfortunately in the HTML standard there is no way to tell the difference between the submission of an unchecked checkbox (which would mean unsubscribed), and the checkbox being missing altogether (which would mean to use the club default settings). Therefore you must use the Javascript solution listed below to work around this issue.
Create a file named webleadform.js with the following contents and place it next to the HTML file containing your form.
        $(document).ready(function() {
			var allPrefsToggle = $('[name="allPrefsToggle"]');
			var textPref = $('[name="textPref"]');
			var emailPref = $('[name="emailPref"]');
			var mobilePhonePref = $('[name="mobilePhonePref"]');
			var workPhonePref = $('[name="workPhonePref"]');
			var homePhonePref = $('[name="homePhonePref"]');


			allPrefsToggle.change(function() {
				textPref.val($(this).is(':checked') ? 'subscribe' : 'unsubscribe');
				emailPref.val($(this).is(':checked') ? 'subscribe' : 'unsubscribe');
				mobilePhonePref.val($(this).is(':checked') ? 'can_contact' : 'cannot_contact');
				workPhonePref.val($(this).is(':checked') ? 'can_contact' : 'cannot_contact');
				homePhonePref.val($(this).is(':checked') ? 'can_contact' : 'cannot_contact');
			});
        });
This code depends on the JQuery library. You can reference it through CDN or download and place it beside webleadform.js and your form. Add the following to your HTML web lead form after the <body> tag (an example of direct link to CDN)
<script src="//code.jquery.com/jquery-1.7.2.min.js"></script>
<script src="webleadform.js"></script>
Now all that remains is to add the form elements. Use the following HTML as a reference
<!-- These five preference fields represent the five options that can be submitted. Not submitting a value will result in club defaults being used -->
<input name="emailPref" type="hidden" value="unsubscribe">
<input name="textPref" type="hidden" value="unsubscribe">
<input name="mobilePhonePref" type="hidden" value="cannot_contact" >
<input name="workPhonePref" type="hidden" value="cannot_contact" >
<input name="homePhonePref" type="hidden" value="cannot_contact" >


<!-- This checkbox will run the above Javascript which will toggle the preference values. -->
<input name="allPrefsToggle" type="checkbox">I hereby consent to receive phone, text and email messages from or on behalf of Club Super Duper at the telephone number and email provided. I understand that consent is not a condition of purchase.
The checkbox will now toggle the values of all five of the communication preferences hidden form fields.
Recommended Anti-Spam Strategies
If order to reduce spam leads, it is highly recommended to use one, or a combination, of the following strategies
Use a Hidden Field to Trick Spam Bots
Spam bots generally process HTML and not CSS or JS. Thus, we can add an extra form input and use CSS or JS to hide the input. In legitimate use cases, users should not see this hidden input, so the value should be empty. However, spam bots might fill up the input with junk data. When we detect a non-empty value for the hidden field, we can flag the web lead as a spam.
In the following example, in normal use cases, comment field should be empty. However, a spam bot might be tricked to fill it with spam message.
<html>
  <head>
    <meta charset=utf-8>
    <title>Web Lead Form</title>
    <style>
        #comment { display: none; }
    </style>
  </head>
  <body>
    <form>
      <label>Email address: <input name="email" type="text"></label>
      <input id="comment" name="comment" type="text">
      <input type=submit value=submit>
    </form>
    <script src=script.js></script>
  </body>
</html>
Use reCAPTCHA
Use reCAPTCHA from Google to make sure it is actual a human that submits a web lead form and not a robot.
The following example uses Invisible reCAPTCHA,
<form id="web-lead-form">
....
<input name="g-recaptcha-response" type="hidden" id="g-recaptcha-response">
...
<button
  class="g-recaptcha"
  data-sitekey="SITE_KEY_FROM_REGISTRATION"
  data-callback="onWebLeadFormSubmit">
  Submit
</button>
</form>
...
<script src='https://www.google.com/recaptcha/api.js'></script>
<script type="text/javascript">
		function onWebLeadFormSubmit(token) {
			document.getElementById("g-recaptcha-response").setAttribute("value", token);
			document.getElementById("web-lead-form").submit();
		}
</script>
On the server end, we can then use g-recaptcha-response to verify with Google that the a form submission actually passes a CAPCHA challenge first.
Use a Spam Filter Service
Akismet is originally designed to help bloggers filter out comment spam. However, it is possible to use the service to detect web lead form spam as well.
Formidable WordPress Plugin Forms
In order to make a Formidable form work with InTouch please follow these steps:
- Install "Code Snippets" Plugin
Create a code snippet and add a special script below that resends the form data to InTouch:
function intouch_resend($entry_id, $form_id){ // add your form ids to this array $form_ids = [127, 124]; if(in_array($form_id, $form_ids)){ $fields = FrmField::get_all_for_form($form_id, '', 'exclude', 'exclude'); foreach($fields as $f){ $key = $f->field_key; switch($f->field_key){ case 'uuid': $key = strtoupper($key); break; case 'firstname': $key = 'firstName'; break; case 'lastname': $key = 'lastName'; break; case 'zipcode': $key = 'zipCode'; break; case 'homephone': $key = 'homePhone'; break; case 'workphone': $key = 'workPhone'; break; case 'contactbirthdate': $key = 'contactBirthDate'; break; case 'leadsource': $key = 'leadSource'; break; case 'leadcomments': $key = 'leadComments'; break; case 'leadsourcedetails': $key = 'leadSourceDetails'; break; case 'productdetails': $key = 'productDetails'; break; case 'textpref': $key = 'textPref'; break; case 'emailpref': $key = 'emailPref'; break; case 'mobilephonepref': $key = 'mobilePhonePref'; break; case 'workphonepref': $key = 'workPhonePref'; break; case 'homephonepref': $key = 'homePhonePref'; break; } $args[$key] = $_POST['item_meta'][intval($f->id)]; } $result = wp_remote_post('https://app.intouchfollowup.com/intouch-webapp/weblead/form/', array('body' => $args)); } } add_action('frm_after_create_entry', 'intouch_resend', 30, 2); add_action('frm_after_create_entry', 'intouch_resend', 30, 2);- In the script you just added modify the line 3 where $form_ids has ids of all of your forms. (list all ids as numbers separated by a comma)
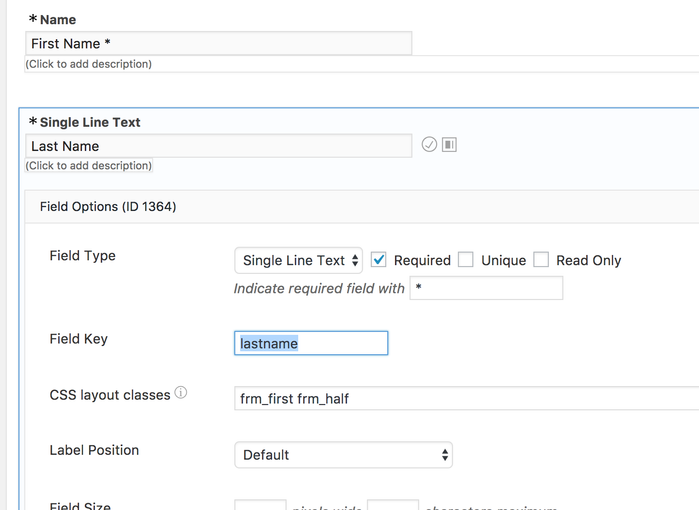
- In your Formidable form make sure you use Field Key for text input items that corresponds to our form input names:
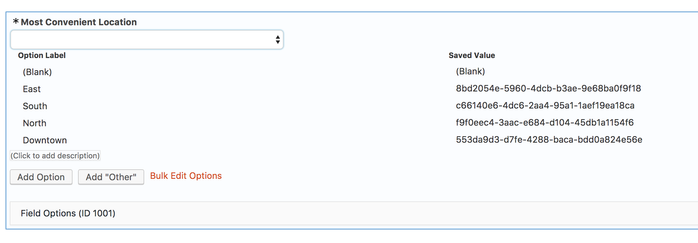
- On club select dropdown use Saved Value for each of the selection items with the appropriate club UUID string:
- Test your form submission and you should see a lead in your InTouch Opportunities.
Privacy Mode
By default, In Touch will append all parameters (first name, last name, mobile no, etc) to the return URL (identified as successPage in the form). Some tools like Google Analytics, have a problem with this. To avoid this issue, add following to the form:
<input name="enablePrivacyMode" id="enablePrivacyMode" type="hidden" value="true" />